✅P353_kubesphtere-定制化安装与界面介绍
大约 1 分钟
写在前面
将k8s-node2、k8s-node2调整为6核12G
定制kubeSphere插件
官网:https://kubesphere.io/zh/docs/v3.4/pluggable-components/overview/
方法一
编辑 Kubernetes 中名为 ks-installer 的 ConfigMap
kubectl edit cm -n kubesphere-system ks-installer
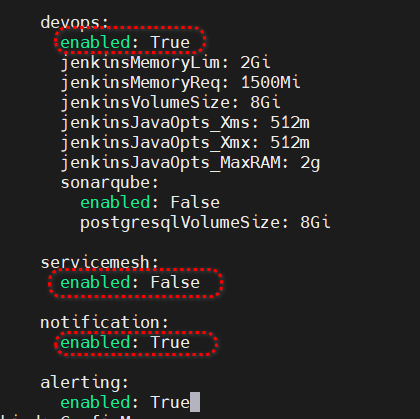
定制的内容如下,将其enabled修改为:True
- devops
- notification
- alerting
监控扩展插件安装进度、是否正常【大概安装20min】
kubectl logs -n kubesphere-system $(kubectl get pod -n kubesphere-system -l app=ks-install -o jsonpath='{.items[0].metadata.name}') -f
方式二
在kubeSphere控制台操作【由于我的kubeSphere版本v2.1.1有点低,页面没有集群管理,高点版本会有展示】
- 使用 admin 用户登录控制台。点击左上角的 "平台管理",然后选择 "集群管理"
- 点击 "CRD",然后在搜索栏中输入 "clusterconfiguration",点击搜索结果查看其详情页。
- 在自定义资源中,点击 ks-installer 右侧的 ,然后选择编辑 YAML
页面介绍
官网:https://kubesphere.io/zh/docs/v4.1/04-platform-management/01-platform-features/
问题解决
Failed to pull image "kubesphere/jenkins-uc:v2.1.1"
https://ask.kubesphere.io/forum/d/1770-arm

